When the Apple II computer became available in 1977 it did not ship with a display monitor. Apple could not get FCC approval for a Radio Frequency (RF) Modulator connecting the computer to a standard Television. Instead Apple partnered with another company, M&R Enterprises of Sunnyvale California, to create the standalone Sup’R’ Mod. This device, one of the first Apple II peripherals, connected an Apple II computer to a standard television, presenting a color signal on UHF channel 33.
Apple’s first monitor was the Apple Monitor III (manufactured by Sanyo), designed to complement the Apple III computer introduced in 1980. Apple’s first monitor designed specifically for the Apple II computer (Apple Monitor II) was introduced in 1983. Prior to 1980 Apple I and Apple II owners used a variety of monochrome NTSC composite CRT monitors, many of which had been designed for use as video monitors. The Sanyo VM-4092 and VM-4209 monitors were often used with Apple I and early Apple II computers. These monochrome monitors could be powered by either 12V DC (useful for mobile applications) or 120V AC and were originally designed for monitoring video production or security surveillance video. They initially used BNC connectors as their video signal input ports, later adding RCA connectors.
Apple II with Sanyo VM-4092 Monitor
By the 1980’s a number of companies sold NTSC composite CRT monitors designed for the burgeoning personal computer market. Popular brands included Amdek, Apple, Dynax, Princeton, Sakata, USI and Zenith.
Monochrome CRT monitors used either white, green or amber phosphors. The majority of composite CRT monitors used a green phosphor (P1), in part because of longer persistence. Amber CRT displays (P3 phosphor composed of Zn8:BeSi5O19:Mn) were thought to reduce eye strain. On virtual CRT displays the RGB values 255, 191, 0 will approximate amber CRT display.
Apple II Green Phosphor Monitor
Dynax Amber Phosphor Monitor
In 1982 I purchased my first ‘home computer’: a Franklin Ace 1000 (Apple II Clone), with two Lobo 5.25 floppy disk drives and a USI Pi3 12 inch amber display monitor. The USI Pi3 amber composite monitor (USI Industries, Brisbane, CA), is a 12 inch high resolution 20 MHz CRT monitor capable of displaying 80 columns x 24 lines of sharp text.
I recently acquired a vintage USI PI3 amber monitor (Model VM-1230, manufactured in 1982). The screen has no burn-in and it works well with the Videx 80 Column card in my Franklin Ace 1000. In the photo below the text looks yellow but in reality it is amber/orange.
USI Pi3 Amber Monitor Display
USI Pi3 Monitor Display
The USI Pi3 monitor has a number of external controls (located in a compartment below the screen): Horizontal Width, Focus, Horizontal Hold, Brightness, Contrast, Vertical Hold, Vertical Size and Vertical Linearity. There is an interesting video on Adrian’s Digital Basement II discussing the related USI Pi4 amber monitor.
I have been unable to find either a user manual or service manual for this monitor. If you know where I can find either, please let me know.
In Spring 1981 I was finishing up my medical internship at a busy teaching hospital. Despite a crazy on-call schedule and chronic sleep deprivation, I had also managed to successfully complete a diploma course in computer science at a local college. I heard from a colleague that one of the hospital’s consultant physicians has been gifted an Apple II computer and was interested in using it to manage medical data. At the time, the idea of using a ‘personal computer’ in medicine was both novel and exciting.
In July 1981 we embarked on a six month project to design and implement an Apple II database system to manage information related to gastrointestinal (GI) endoscopy procedures performed at Mater Misericordiae University Hospital in Dublin, Ireland.
The hardware consisted of an Apple II Europlus with 48K of RAM, two 140K floppy disk drives, a 40 column monochrome display monitor and an Anadex DP-9501 dot matrix printer. The database system was named the Computerized Endoscopy Data Management System (CEDMS).
Initially we considered implementing CEDMS using an Apple II commercial database software package called the CCA Data Management System (Personal Software, 1980). However, following a detailed evaluation, it was clear that CCA was not suited to our needs and we instead chose to develop a custom database application written entirely in AppleSoft BASIC.
The CEDMS project had three major goals: (1) the database should support storage, retrieval and reporting of the core administrative and clinical data related to GI endoscopies performed at the hospital; (2) the system should be turnkey, easy to use and tolerant of user errors and (3) given that approximately 5000 GI endoscopy procedures were performed at the hospital each year at that time, we would need a storage model that could accommodate that volume of data using only 140K floppy disks. In 1981 a Corvus 10MB hard disk for the Apple II cost $5000 (approximately $17,000 today) and was beyond the project’s budget.
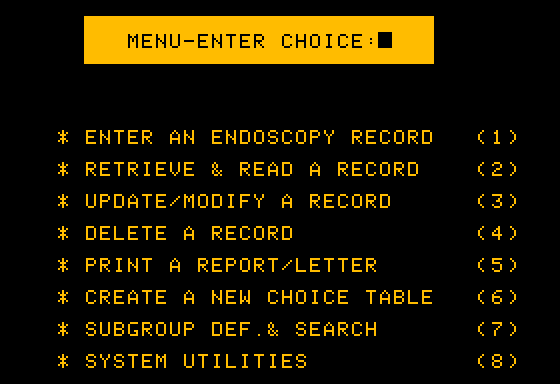
CEDMS Main Menu
The CEDMS database was implemented using the Random-Access Files feature of Apple II DOS. Each data file contained a set of sequentially numbered fixed-length records that could be directly accessed from BASIC using the record’s sequence number. To support searching, data file records were indexed using a b-tree of calculated keys. This design created a simple Indexed Sequential Access Model (ISAM) database. Though not a true relational database, the relational schema diagram below approximates the CEDMS database model.
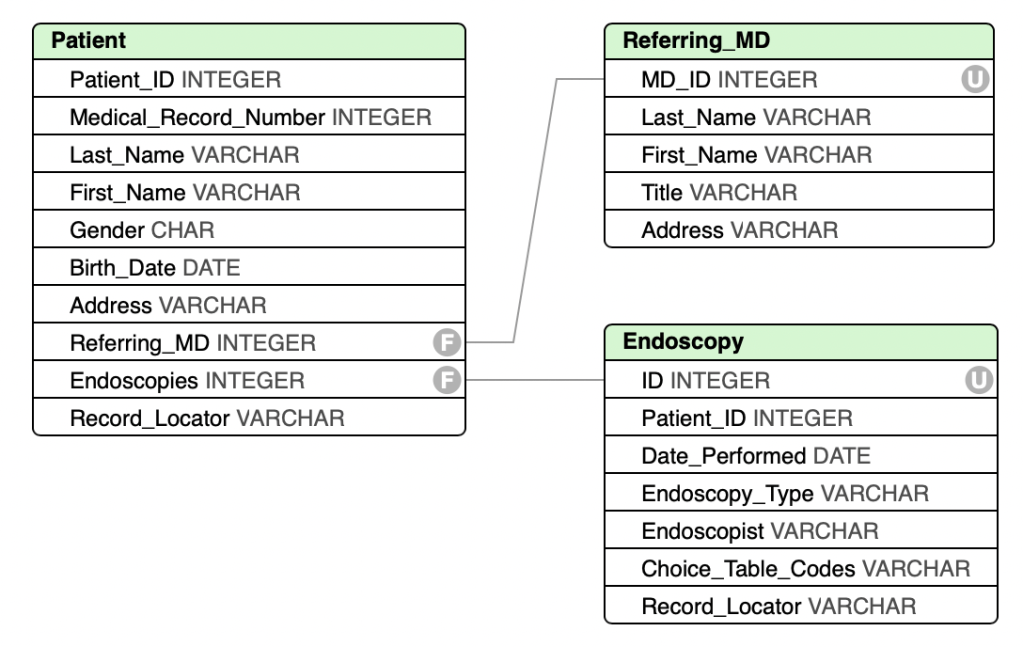
CEDMS Database Schema
CEDMS used three linked databases: Patient, Referring Physician and Endoscopy. The Patient Database contained a record for each patient upon whom an endoscopic procedure was performed. Each Patient Record stored a person’s name, date of birth, gender, home address, hospital ID number and a list (record IDs) of the GI endoscopy procedures performed on that patient. The Endoscopy Database contained a record for each procedure performed including: type of endoscopy (e.g. Upper GI Endoscopy, Colonoscopy), the reasons for the endoscopy, prior radiology findings and the endoscopy findings (including histology).
As a hard disk was not within the project’s budget, we had to devise a method of storing and retrieving several thousand patient and endoscopy records using multiple 140K floppy disks. To achieve this goal we: (1) implemented sparse endoscopy records (see below) that allowed CEDMS to store approximately 1,000 endoscopy records per floppy disk and (2) implemented an algorithm that would prompt the user to insert the appropriate floppy disk from a set of disks storing patient and endoscopy records.
Sparse endoscopy records were implemented using Choice Tables. These were tables of numbered choices displayed on the screen (see example below). A user entering the endoscopy data would select one or more numbered choices from a set of tables and the database would store the selection and table number rather than the full text of each selected item. This significantly reduced the size of each stored endoscopy record as only the number(s) of the items selected were stored. Using two 8 bit bytes, it would be possible to store the 16 boolean values (selected=1, unselected=0) for each Choice Table.
CEDMS supported the creation and modification of new choice tables when designing a database. Multiple tables per database were supported with up to 16 selection items per table and support for multiple selections within a table. When retrieving data the stored Choice Table boolean values were used to retrieve and display the text associated with each selected item .
CEDMS Choice Table
As patient and endoscopy records would be stored across multiple floppy disks an automated method for prompting the user to insert the correct floppy disk was needed. To achieve this goal we created a set of pre-formatted floppy disks to store patient records based on the first letter of the patient’s last name. Rather than creating a set of 26 patient record disks ( ‘A’ to ‘Z’) we examined the 1981 Dublin telephone directory to approximate the statistical distribution of these last name first letters in the Irish population. This allowed us to create an extensible set of 9 floppy disks that could (in total) store approximately 5000 patient records per disk set, with each disk in the set assigned to one or more letters of the alphabet.
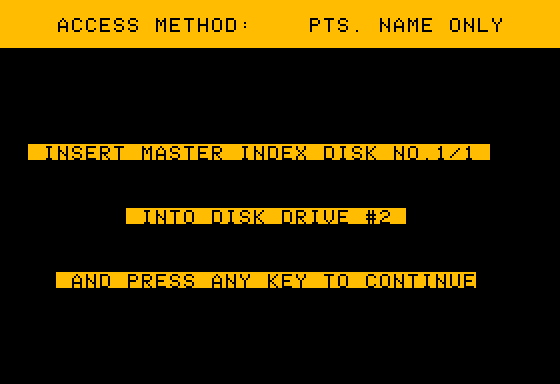
Automated prompting of the user to enter the floppy disk containing a specific endoscopy record was achieved by creating an extensible set of endoscopy data disks, each with a unique numeric identifier. When recording an endoscopy data record the disk identifier and endoscopy record number on that disk were automatically stored in the list of endoscopies linked to each patient record. CEDMS prompted the user to insert the correct data disk into the disk drive before reading or writing data. Each disk contained a unique identifier that prevented data being written to the wrong disk.
CEDMS Prompting for Data Disk
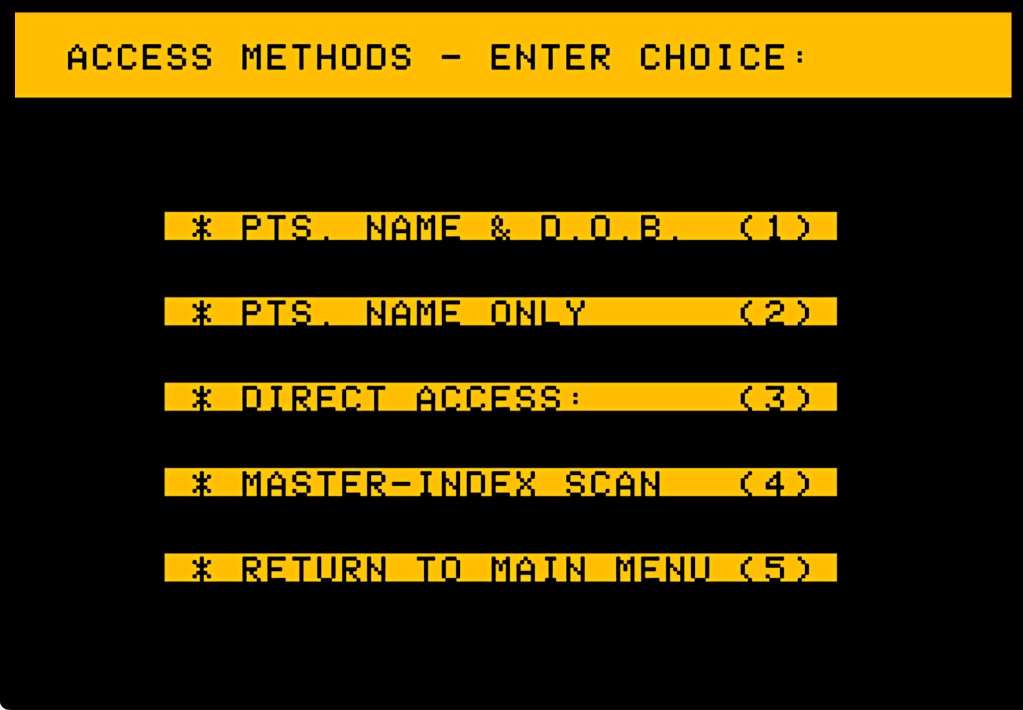
Retrieval and reporting were limited in CEDMS. The database could be queried by patient name and patient date of birth. Alternatively if a record ID was known it could be used to retrieve that record. There was also a sequential “Scan” option which allowed for partial information to be used to find one or more matching records. Once a a patient record was found the endoscopy records for that patient could be easily retrieved, viewed and printed.
CEDMS Retrieval Menu
In October 1981 we presented a paper on CEDMS at a scientific conference in London organized by the British Society of Gastroenterology. At this meeting presentations on related computer-based systems were also made by groups from Britain, New Zealand and the United States.
In January 1982, I started medical residency training in the United States, thus ending my role in the CEDMS project. However, work on the project continued after I left, particularly on the implementation of reporting functionality and migrating the system to a hard disk storage model.
In late 1982 CEDMS begin using a hard disk for data storage – a SyMBFile 5.25-inch Winchester Disk that came in 5MB and 10 MB configurations. The hard disk was partitioned into 12 volumes containing the CEDMS AppleSoft BASIC code and nine volumes that simulated the original set of the nine floppy-based Master Index groups that we had originally created to store patient data. The system code was modified to automatically read and write data to/from the hard disk instead of prompting the user to manually retrieve and insert the correct floppy disk. CEDMS later supported the ability to automatically format and print endoscopy reports for referring physicians.
In retrospect CEDMS was a simple standalone medical database system that reflected the limitations of the speed, memory and storage capacity of early personal computers. Other than basic patient and referring physician demographics there was no provision for the entry of textual or structured data. Searching and reporting functionality was limited and slow. However, the solution for storing several thousand endoscopy reports on a set of nine 143K floppy disks was inventive and effective, albeit with the downside of manual retrieval and insertion of disks by the operator.
CEDMS was one of the first attempts at creating a personal computer-based endoscopy data management system. Today computer systems play an important role in modern endoscopy practice by enabling efficient storage, processing, and retrieval of high-resolution images and videos captured during procedures. Modern systems facilitate integration of endoscopy data with electronic health records (EHRs), ensuring that patient data is securely stored and easily accessible for diagnostic and treatment planning. Advanced software tools analyze endoscopic images, supporting physicians with real-time insights and aiding in the early detection of abnormalities.
In late 1982 I purchased my first ‘personal’ computer. Up to that point I had been using a variety of microcomputers and time sharing systems at school and work. My preferred home machine was an Apple II Plus computer but a fully equipped system was beyond my budget. Instead, I purchased a more affordable Franklin Ace 1000 with two 5.25 inch Lobo floppy disk drives, a disk drive controller card and a USI Pi3 amber monitor.
The Franklin Ace 1000 was an Apple II Plus clone, manufactured by Franklin Computer Corporation. The Ace 1000 came with 64K of RAM, a full upper/lowercase Keytronics auto-repeat keyboard and a big 65W power supply that contained a built-in cooling fan. Franklin copied the Apple II ROMs, so the Ace was compatible with almost all Apple II software and cards. However, it did not initially support Apple II color graphics. I later added a Videx 80 Column Display card, a Serial Interface card, a PKaso parallel printer interface card, and a C.ITOH 8510 printer.
Franklin Ace 1000 Advertisement
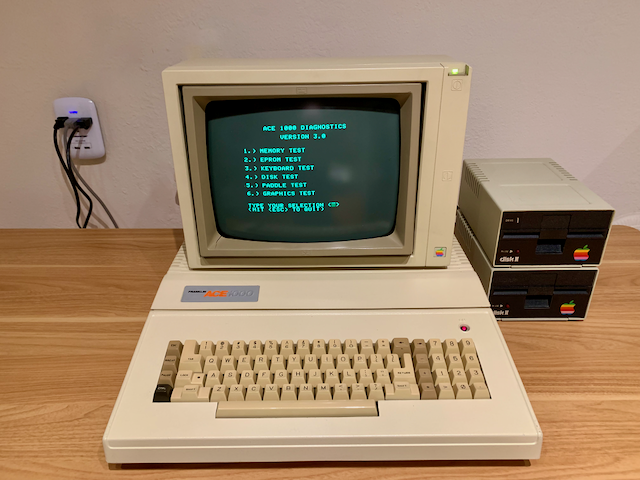
While the Franklin Ace 1000 could boot from an Apple DOS 3.3 startup disk, it shipped with a Franklin DOS disk containing a modified version of Apple DOS that supported lowercase commands and file names. This disk also included a Franklin Diagnostics program to test the Ace 1000 RAM, EPROMs, keyboard, disk drives and graphics modes. The disk also contained a FUD utility program (similar to the Apple II FID program) to handle common disk and file tasks. Using these Franklin programs is described in the Franklin Ace 1000 User Reference Manual. The appendix of this manual contains a listing of the differences between the Apple II and Franklin Ace 1000 ROMs. The Franklin Ace Dealer Service Manual contains additional detailed technical information about the Ace 1000 motherboard, disk drives, video monitor and hardware trouble shooting.
I sold my Franklin Ace 1000 in 1984 after purchasing an Apple Macintosh computer. However, I had fond memories of this first ‘personal computer’ and when I saw an Ace 1000 advertised as ‘not working’ a few years ago, I purchased it and stored it away until I had time to determine what was wrong. It turned out that the computer itself (though quite dirty) was fine. The problem was the keyboard.
The Franklin Ace 1000 Keytronic keyboard uses capacitive foam and foil switches. The foam degrades over time and the pads no longer make contact and have to be replaced. I was able to purchase replacement pads from TexElec. The removal and replacement process is tedious (and messy – as the foam disintegrates) but in the end I had a fully functional keyboard. There is a helpful repair video on this topic available at Adrian’s Digital Basement. I found a chip puller (to remove the key caps) and a dental scaler tool (to remove the pads) very useful.
Franklin Ace 1000 Keyboard after KeyCap Removal
Keyboard Foil and Foam Pads Exposed
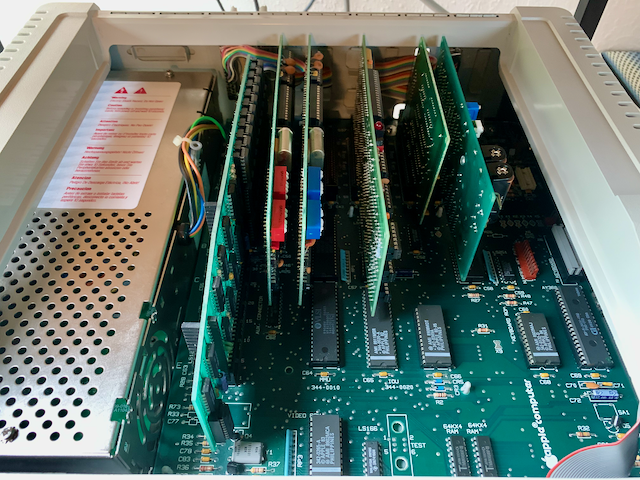
Once the keyboard was functional, I removed the ICs, cleaned the motherboard and used DeoxIT on some of the more suspect connectors. The Franklin power supply (Astec 12180) uses RIFA capacitors, which should be replaced. If the power supply fan is noisy, it can also be replaced with a modern 12v 120mm fan.
Franklin Ace 1000 Motherboard and Power Supply
After a thorough cleaning and reassembly the Ace 1000 is fully functional. Now all I need to find is a USI Pi3 amber monitor.
Restored Franklin Ace 1000 System
In 1982 Apple successfully sued Franklin claiming copyright infringement of the Apple II ROM and the Apple II DOS operating system. The case established for the first time that code in ROM (Firmware) was protected by copyright, that machine readable code (not just source code) was protected and also that operating systems were covered by copyright. Franklin agreed to pay Apple $2.5 Million in damages. When Apple introduced the ProDOS operating system in October 1983, Franklin Ace owners discovered that Apple had added software which prevented ProDOS launching on non-Apple computers. However, software patches to defeat this protection system were soon available. Modern versions of ProDOS do not contain this restriction and do not require a patch.
Apple II Pascal is an implementation of a portable Pascal language system developed at University of California San Diego (UCSD) in the late 1970s by Professor Kenneth Bowles and his students. The UCSD Pascal system contained a menu-based operating system and an IDE (Integrated Development Environment) consisting of a Filer, Editor, Compiler, Linker and Assembler. The code generated by the UCSD Pascal compiler ran on a virtual p-code Machine that used an interpreter written in the host computer’s assembly language to translate p-Code to native code. This programming model had the advantage that Pascal code written on one UCSD Pascal system should run on other UCSD Pascal systems.
The porting of UCSD Pascal to the Apple II was heavily influenced by two Apple employees: Jef Raskin, who had taught computer science at UCSD and Bill Atkinson, who was a UCSD computer science graduate. Apple co-founder Steve Wozniak was involved in the development of the Apple II Pascal BIOS which linked Pascal’s I/O (input/output) routines to the Apple II ROM I/O routines. In 1979, Apple released version 1.0 of Apple II UCSD Pascal (referred to as Apple II Pascal hereafter) at a cost of $495 (approximately $2,100 in today’s dollars). It came with a 16K hardware ‘Language Card’ (to increase the Apple II Plus’ memory from 48K to 64K), 4 reference manuals and four 5.25″ system disks.
Apple II Pascal Box
Apple II Pascal was updated a number of times, with the final version (1.3) released in 1985. It became an important development environment for Apple II software, including: Apple Business Graphics, Apple Presents the IIe, AppleWorks Tutorials, Dollars & $ense, Incredible Jack, PFS, PSort, QuickFile, Thinktank, Smartcom, Versaform and Wizardry.
Apple II Pascal Customized Start-up Screen
The Apple II Pascal operating system ‘takes over’ the Apple II computer and the programs created in Apple II Pascal will only run under the Pascal operating system. This meant that programs written in Apple II Pascal could not be distributed as standalone applications running under DOS or ProDOS. Instead they were distributed on a disk containing an Apple II Pascal runtime system that, when booted, provided the Pascal environment in which the program would execute.
The Apple II Pascal Filer provided a set of tools for creating and managing disks and files within the Apple II Pascal operating system. Apple II Pascal disks used a block-based format that was different from the disk format used by DOS and ProDOS. Apple II Pascal disks (called Volumes) can store a maximum of 77 files and the disk blocks used by a file must be contiguous. As this could lead to significant disk fragmentation, the Apple II Pascal Filer included a defragmentation utility (‘Krunch’) that optimized file storage. The Apple II Pascal Operating System Reference Manual describes the Pascal Filer in detail.
Apple II Pascal Filer Directory Listing
The Apple II Pascal Editor provided a powerful (for the time) full-screen text editor to create and edit Pascal source code (or 6502 Assembly code) and also served as a simple word processor. While Apple II Pascal will work with either a 40 column or 80 column screen, the latter was highly desirable. The Apple II Pascal Operating System Reference Manual describes the Editor in detail.
Apple II Pascal Text Editor
The Apple II Pascal Compiler converts the source code text of a Pascal program into compressed p-code (bytecode) that will run on the Apple II Pascal p-machine. This single-pass compiler was slow, processing 150-300 lines of source code per minute, depending on the compiler settings. The Apple II Pascal Linker supported the inclusion of separately compiled code (Pascal or 6502 Assembly Language) into an Apple II Pascal program code file.
Setting up an Apple II UCSD Pascal System
Software: The final version (1.3) of Apple II UCSD Pascal was released in 1985, on five 5 1/4 disks (Apple 0,Apple 1,Apple 2, Apple 3, Attach). Version 1.3 has many advantages over earlier versions, including support for 128K of RAM plus bug fixes. If you plan on using Apple II Pascal on either an Apple IIe or Apple IIc with an Extended 80-Column Text Card, you should use the 128K system; if you have anything else, you must use the 64K version of the system. The 128K system supports larger programs, multiple libraries and a faster compile/link/execute cycle.
Version 1.3 of Apple II UCSD Pascal is available for download (for $20) on the Apple Programmers and Developers Association (APDA) Software Library CD available from Juiced. The download includes the APDA CD in ISO format and a ZIP-compressed archive. The 5 Apple UCSD Pascal 1.3 disks are in the ‘Apple II Pascal 1.3’ folder.
Apple II Pascal Disks
Documentation: The definitive manual for Apple II Pascal version 1.3 is the Apple // Pascal 1.3 Workbench. This 950-page book includes detailed information on the Filer, Editor, Compiler, Linker and Assembler. It also includes a comprehensive reference for the UCSD Pascal language dialect.
If you would like to learn more about programming in Apple II UCSD Pascal, I recommend The UCSD Pascal Handbook – A Reference and Guidebook for Programmers by Clarke & Koehler (link is to the table of contents only) and Apple Pascal: A Hands-On Approach by Luehrmann & Peckham. An excellent source for information about Apple II UCSD Pascal is here.
Hardware: While you can run Apple II UCSD Pascal on any member of the Apple II family of computers, I recommend using an Apple II simulator to take advantage of virtual hard disks and CPU acceleration. I use Virtual ][ ,the amazing Apple II, II+,IIe and IIc emulator for the Macintosh written by Gerard Putter. My Apple II UCSD 128K Pascal development machine under Virtual ][ is configured as follows:
Under Machine -> Configure -> Components -> CPU select ’65C02′.
Under Machine -> Configure -> Components -> CPU Speed select ‘1 MHz’.
Under Machine -> Configure -> Components -> Keyboard select ‘Backspace acts as left-arrow key’.
Aux Slot: A 1024K RAMWorks card, configured as a 960K RAM disk. This also provides an 80-column display. Note that Apple II Pascal does not support RAMWorks virtual disks greater than 4096K.
Slot #1: A Serial Printer Card connected to an ImageWriter II printer (Apple II Pascal expects to find a printer in Slot #1).
Slot #5: Two 5 1/4 inch disk drives.
Slot#6: Two Apple II Pascal-compatible 10 MB Profile-like hard disks (called ‘Omnidisks’ in Virtual ][).
Slot #7: A Thunderclock card, so that the UCSD Pascal operating system will automatically time stamp the creation and modification dates of files (this requires a patch to Apple UCSD Pascal version 1.3 that I cover in a seperate post).
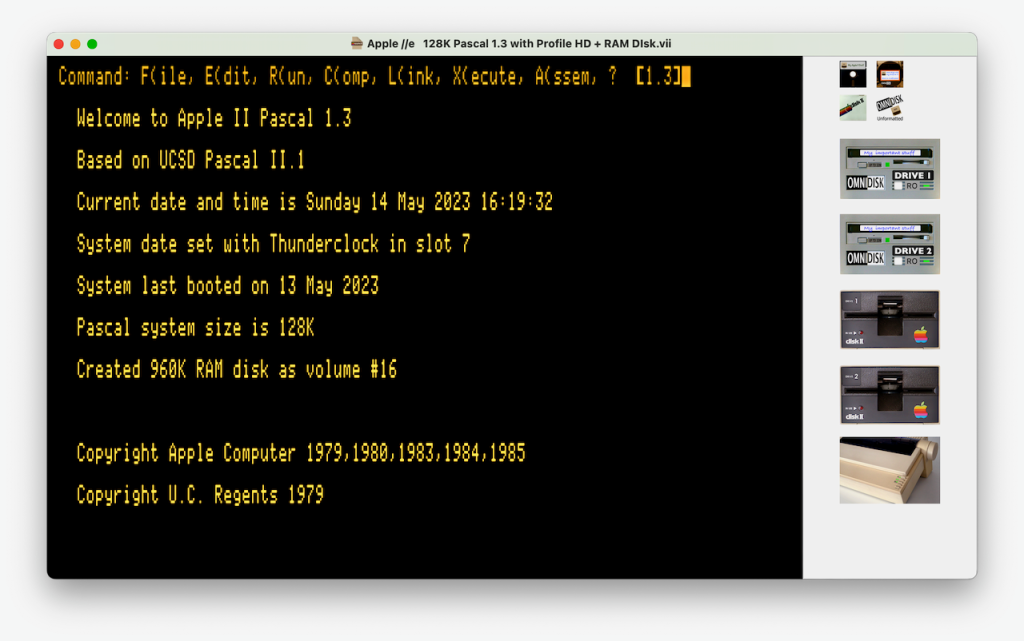
Apple II UCSD Pascal (customized startup screen) running in the Virtual ][ Simulator
Once this hardware simulator configuration has been created, do the following:
Insert Apple II Pascal version 1.3 disk ‘Apple 1’ into 5 1/4″ disk drive #1.
Type ‘PR#5’ and press the RETURN key to boot into Apple II Pascal.
The Apple II Pascal operating system should appear.
Click on OmniDisk Drive 1 and select ‘Create Blank OmniDisk…’.
Create and save a 10 MB hard disk named ‘PASBOOT’.
Click on OmniDisk Drive 2 and select ‘Create Blank OmniDisk…’.
Create and save a 10 MB hard disk named ‘PASDATA’.
In Apple II Pascal type ‘X’ (eXecute) and then type ‘formatter’
In response to ‘Format which volume # ?’ type ‘11‘ and then ‘Y’.
When prompted for a volume name, enter ‘PASBOOT’
Now format volume # 12, creating a hard disk named ‘PASDATA’
Press the ESC key to exit the formatter utility.
Next, type ‘F’ and ‘V’ to confirm that the two new hard disks were created.
We now copy the contents of the ‘Apple 1’, ‘Apple 2’ and ‘Apple 3’ disks to the ‘PASBOOT’ hard drive. To do so, insert (in turn) the ‘Apple 1’, ‘Apple 2’ and ‘Apple 3’ disks into the first 5 1/4 disk drive and from the Filer type ‘T’ (Transfer). When prompted for ‘Transfer what file ?’ enter ‘#4:=’ (copy all files on device #4) and when prompted with ‘To where ?’ enter ‘PASBOOT:$’ (copy the selected files to device ‘PASBOOT’ using the same file names. When asked to overwrite any existing file, answer ‘N’.
Finally, as the simulated Apple IIe is a 128K computer we need to install the 128K version of the files ‘System.Apple’ and ‘System.Pascal’. To do so type ‘F’ to enter the Filer and then type ‘T’ (Transfer) to replace the default versions of ‘System.Apple’ and ‘System.Pascal’ on the hard disk ‘PASBOOT’ as follows: In response to ‘Transfer what file ?’ type ‘PASBOOT:128K.Apple’ and when prompted with ‘To where ?’ type ‘PASBOOT:System.Apple’. This replaces the file ‘System.Apple’ with the contents of the file ‘128k.Apple’, while keeping the ‘System. Apple’ file name. When asked ‘Remove old PASBOOT:System.Apple’, answer ‘Y’. Follow the same procedure to replace ‘System.Pascal’ with the contents of the file ‘128k.Pascal’.
Quit the Filer, eject any floppy disks from the 5 1/4″ inch floppy drives and select ‘Restart Virtual Machine’ from the Virtual ][ ‘Machine’ menu. This will reboot the Apple II Pascal system using the ‘PASBOOT’ hard disk as the startup device.
After rebooting, enter the Filer and type ‘V’. You will see that the device number assignments have changed and the hard disk ‘PASBOOT’ is now device #4 (the Apple Pascal boot disk is always device #4).
Type ‘F’ and ‘D’ to enter today’s date. Type ‘Q’ to quit the Filer.
Finally we need to apply an Apple II Pascal 1.3 patch to the Apple II boot disk to fix two Apple II Pascal 1.3 bugs. Insert the Apple II Pascal ‘Attach’ disk (found in the Apple Pascal 1.3 folder on the APDA Software Library disk) into the first 5 1/4″ disk drive. Type ‘X’ (Execute) in the Apple II Pascal operating system. When prompted, type ‘#11:Patch’. When prompted with ‘Please enter the number of the unit containing the diskette with the System.Apple file to be updated’, type ‘4’ and press RETURN. After the patches are applied reboot Apple II Pascal.
It is necessary to defragment the ‘PASBOOT’ hard disk after installing the files. To do so type ‘F’ to enter the Filer and type ‘K’ to launch the Krunch utility. When prompted with ‘Crunch what volume ?’ type ‘PASBOOT:’ and answer ‘Y’ when asked ‘From end of volume, block 20480 ?’. You may be prompted to reboot Apple II Pascal after the Crunch utility has finished.
Testing: To test the Apple II Pascal system that you have installed, type ‘E’ to launch the Editor. When prompted with ‘Edit what file’, type ‘hilbert’. When the source code for the Hilbert program has been loaded into the editor, type ‘U’ (to update the current project) and ‘E’ to exit. Now type ‘R’ to compile and run the Hilbert program. When prompted for a ‘Listing file’, press RETURN. The Apple II Pascal compiler will now compile the Hilbert source code and run the program. The Hilbert program will ask ‘ORDER:’, type 6 and RETURN to see some Apple II Pascal graphics in action. Press the Space bar to try another ORDER (1-6 or 0 to exit), but this time select ‘maximum Speed’ from the Virtual ][ ‘Machine’ menu.
Simulator CPU Speed: One advantage of using an Apple II hardware simulator is the ability to use CPU acceleration. This is important when using Apple II Pascal, which is quite slow when run at standard CPU speed. I choose either ‘High Speed’ or ‘Maximum Speed’ from the Virtual ][ ‘Machine’ menu when editing, compiling or linking, and switch back to ‘regular Speed’ when running a Pascal program.
You are thinking about acquiring a 40 year-old Apple II computer. Perhaps you are feeling nostalgic and wish to play fondly remembered games or you plan on getting back into BASIC programming. In my case I wanted to reconstruct the Apple II Pascal development environment I used in 1982. Having recently gone through the process of acquiring and setting up a functional Apple II system, I would like to share what I have learned.
There are two possibilities: (1) acquire an Apple II machine (2) use Apple II emulator software. Let’s consider the pros and cons of each option.
Hardware: Apple II Pascal will run on the Apple II+, Apple IIe, Apple IIc or an Apple IIgs (in Apple IIe emulation mode). There is also an Apple III version of Apple Pascal that is specific to that computer. I have used Apple II Pascal on both an Apple IIe and on a Franklin Ace 1000 (an Apple II+ clone). The Apple IIe, with 128K of RAM and 80-column text display, is a good option as the extra 64K of memory is supported by version 1.3 of Apple II Pascal, allowing for larger programs and slightly speedier operation. The IIe also has a more extensive keyboard than the Apple II Plus.
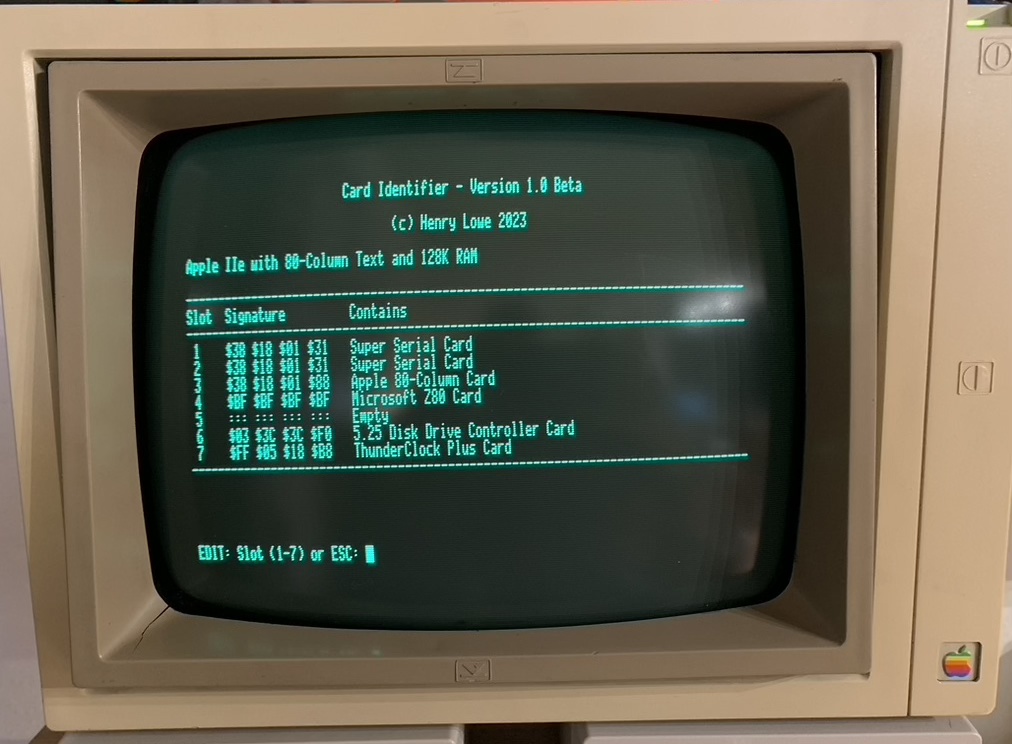
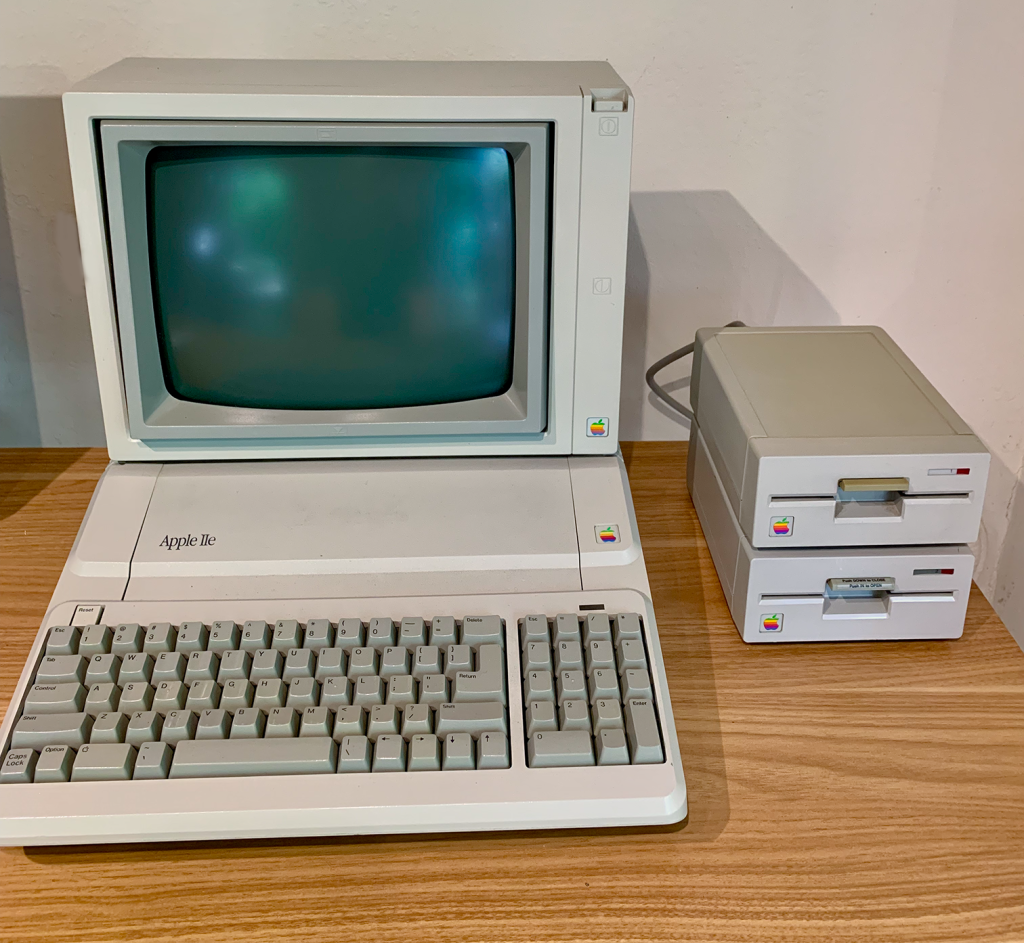
Buying a 40 year-old Apple II to run Apple II Pascal comes with caveats. You will need not just the computer but also two external disk drives, a disk drive controller card and a display monitor that supports 80-column text. This is a photo of the Platinum Apple IIe system that I assembled from various online sources.
The Apple IIe is a good choice for the first-time buyer. With almost six million units sold, there are still a lot of Apple IIe computers out there. Late model Apple IIe computers contain fewer components and are therefore less likely to experience hardware issues that the earlier Apple II or Apple II Plus computers. The Apple IIe Platinum is particularly desirable because of its built-in support for extended memory (128K of RAM), 80-column text display and larger keyboard. It retains compatibility with most of the hardware and software developed for earlier Apple II computers.
If the computer is an Apple II+ or compatible clone (e.g. my Franklin Ace 1000 shown here) you will also need an 80-column display card (such as the Videx Videoterm). On the Apple IIe, 80 column display support is provided by the auxiliary extended 80-column text card.
An additional caveat is that a 40 year-old computer is way past its expected lifespan and could manifest with a variety of hardware issues that you may need to address. Common issues include:
Apple II power supply units (PSU) degrade over time and may require replacement or rebuilding. A failing PSU can result in the computer not starting up or malfunctioning when additional cards are added. A more dramatic failure may occur when the RIFA capacitors in the PSU gently explode!
If you acquire an old Apple II, consider replacing the PSU before using it. ReActiveMicro sells an affordable and reliable replacement PSU kit and will also refurbish your existing Apple II PSU. A word of warning: the interior of a PSU contains high voltage components that can deliver fatal electrical shocks, even when unplugged. Never open an Apple II PSU case unless you know what you are doing!
Another common issue with 40 year-old Apple II computers is that electronic components (other than the PSU) such as integrated circuits (ICs), transistors, capacitors and resistors may fail. Again, this can result in the computer not starting up, failing to complete the boot process, experiencing intermittent crashes or manifesting display issues. Determining which components are faulty can be a complicated and time-consuming process.
Sometimes fixing component issues is as simple as reseating the ICs (turn the computer off, carefully remove the IC from its socket, clean the pins and carefully reinsert the IC). Beyond this you are into a (potentially fun) world of repair manuals, arcane knowledge and test equipment. If you are so inclined, there are a number of helpful online repair videos, such as Adrian’s Digital Basement and Chris Torrance’s Assembly Lines. There are also dedicated repair services, such as Joe’s Computer Museum.
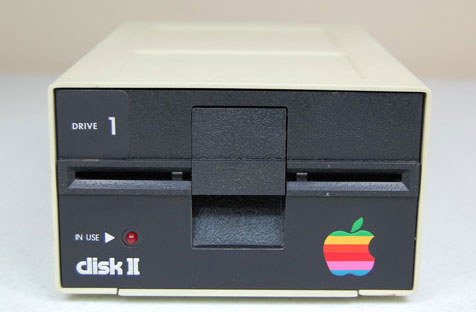
Another potential issue to highlight is that Apple II disk drives and the 5.25″ disks they use also degrade over time and can be a source of failure. Apple 5.25 inch double-sided, double-density (DS/DD) floppy disks are now hard to find/buy – try here.
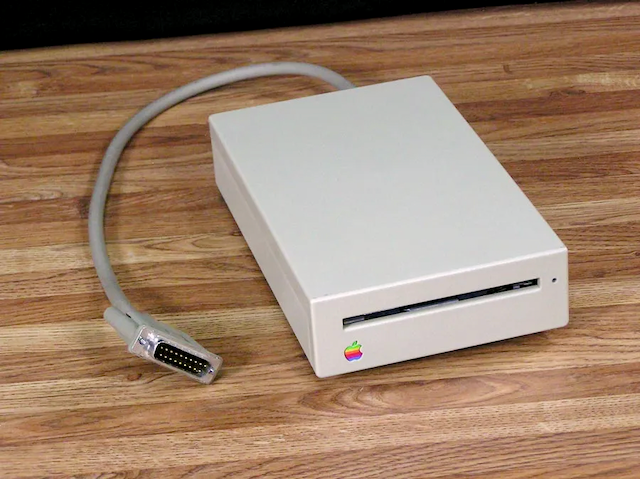
An alternative to 5.25 inch disks on the Apple IIe, IIc and IIgs are 3.5 inch disk drives. These drives use 800K disks, providing about five time the storage capacity of the standard Apple II 143K disks. On the Apple IIe a special disk drive controller is required to support 3.5 disk drives.
There are also a number of modern Apple II virtual disk drives designed to support both floppy disk emulation and hard disk emulation using compact flash cards or USB drives. ReActiveMicro sells the CFFA3000 card. The Booti card is a popular alternative, as is the Floppy EMU card. These virtual drives offer many advantages over physical disks: speed, storage capacity and reliability.
If you want to buy an Apple II computer, where do you find one and how much do they cost? I suggest starting with eBay. Sellers on eBay offer a constant stream of Apple II family computers for sale. In May 2023, a functioning Apple IIe with two disk drives (without a display monitor) cost in the $200-$350 price range. If you are lucky you may see a complete Apple IIe system for sale with a display monitor, usually at a higher price point. One advantage of eBay is that you have some protection if the item advertised is not what you receive.
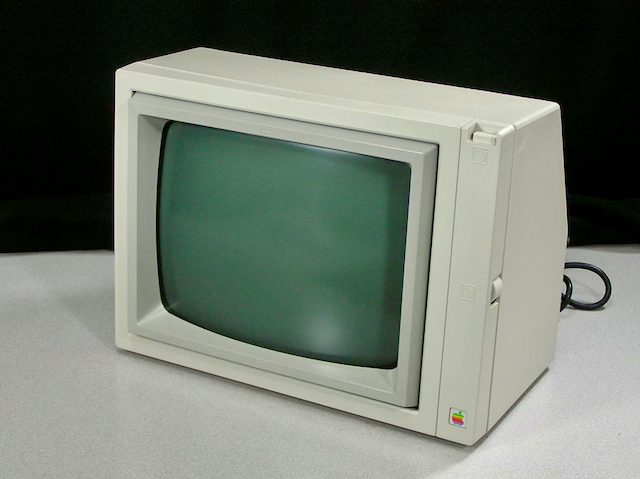
Apple II composite display monitors that are capable of displaying 80-column text cost in the $150-$300 price range on eBay. Beware of high shipping costs, particularly if the system contains a monitor. An alternative source of Apple II display monitors is Apple Rescue of Denver.
Another possible source for Apple II computers is Facebook Marketplace where you may find an Apple II system for sale locally that you can could pick up and therefore save on delivery charges, while also avoiding possible equipment damage during shipping. Estate sales and used computer marts may also be fruitful areas for exploration.
Apple II Emulators: A considerably less expensive alternative to acquiring/buying/repairing a physical Apple II computer is to use an Apple II emulator. These are programs that run on modern computers and emulate an Apple II computer entirely in software. If you are a Macintosh user, I recommend Gerard Putter’s amazing Virtual ][ app which can emulate the Apple II, Apple II+ and Apple IIc computers – including 80-column displays, disk drives (including hard disks), printers and various cards. On the Microsoft Windows platform the most popular Apple II emulator is AppleWin. They are also a Web-based Apple II emulators, such as Apple IIJSe.
Virtual ][ running on a Macintosh (screen shot) is my preferred platform for Apple II Pascal development. It is a highly accurate emulation of the Apple II, II+, IIe and IIc. Look out for a future post on this topic.
An additional advantage of using an Apple II emulator is free access to thousands of Apple II disk images from sites such as Asimov and Internet Archive. Disk images are files contain the data from old Apple II disks. Emulators, such as Virtual ][, can use these disk image files in the same way that a real Apple II can use floppy disks. If you have a real Apple II computer, disk images can be converted to real floppy disks using ADT Pro software.
So which Apple II option: hardware or software? I chose both. I purchased an Apple IIe and a Franklin Ace 1000 (Apple II Plus clone) on eBay. Both required repairs (more on that in future posts). I also bought floppy disk drives, Apple II display monitors and various cards. I now have both a functional Apple II Plus clone and an Apple IIe as part of my Pascal development environment. I also use Virtual ][ on the Macintosh as my primary Apple II Pascal development platform, for reasons that I will discuss in future blog posting.
In this post I have not discussed the Apple IIc and Apple IIgs computers. This is, in part, because I have no personal experience with either computer. Fully functioning Apple IIc computers are harder to find and tend to be more expensive. The IIgs can run most Apple II software (including Apple II Pascal) in Apple IIe emulation mode but is fundamentally a different platform to the II Plus, IIe and IIc computers.
The same year (1983) that Apple released the Lisa computer I discovered the Pascal programming language. In 1980 I learned to program using BASIC on an Apple II Plus computer. I had taken an introductory class in programming while working as a medical intern and became ‘hooked’. Following my internship I worked as lead designer and programmer on a medical research project to develop an Apple II based endoscopy data management system – more to come on that later.
In 1979 Apple Computer released version 1.0 of Apple Pascal (which was based on UCSD Pascal) to run on the new Apple II Plus computer. As discussed in a prior post, Pascal was to be of enormous importance to the company’s future. Apple Pascal was more than a programming language. It was a complete software development environment (compiler, linker, assembler and editor) embedded within a unique menu-driven operating system.
Version 1.0 of Apple Pascal cost $495 (approximately $2100 in today’s dollars) and came in a box containing a 16K hardware ‘Language Card’ (to increase the Apple II Plus’ memory from 48K to 64K), several reference manuals and five 5.25″ system disks. The first release of Apple Pascal was an expensive professional programmer’s tool that I could not afford at the time.
When I finally purchased Apple Pascal in early 1983 it was at version 1.2 and cost considerably less. I installed it on my Franklin Ace 1000 (an Apple II Plus clone) with 64K of memory, an 80-column display card, 12 inch monochrome amber display monitor, two 5.25″ floppy disk drives and a noisy dot-matrix printer.
The Pascal language was transformative, facilitating structured programming, that produced modular re-usable code that was easier to read, understand and maintain. Pascal became the default language for teaching college-level computer science in the 1980s and influenced the design of many of the programming languages that followed.
So, 40 years later I thought that it would be fun to recreate the Apple Pascal programming environment in which I learned structured programming. To do so I would need an Apple II computer, disk drives, a display monitor, Pascal system disks and manuals. Where to begin? See these posts:
This year marks the 40th anniversary of the 1983 debut of Apple’s Lisa computer, the first commercially available personal computer to use a graphical user interface (GUI). In late 1979, Steve Jobs and a group of Apple engineers visited Xerox PARC in Palo Alto, California. Jobs was impressed by the Xerox Alto computer (which had a mouse-driven GUI, windows and desktop). Many of the Alto’s interface elements were incorporated into the Lisa.
Given its high price ($9,995 – approximately $30,000 in 2023 dollars) and a variety of hardware and software issues, the Lisa was not a commercial success.
The remarkable impact of computer technology on our lives and culture in just a few decades is the result of progressive improvements in two major building blocks of computing – hardware and software. The evolution of computer hardware processing power is often linked to Moore’s Law: the number of transistors in an integrated circuit doubles every two years while the cost is halved over the same time period. Computing hardware advances have resulted in powerful devices, with huge storage capacity and fast network access. Indeed, the ultimate expression of this computing hardware is the Internet itself, fulfilling the prophesy of John Gage of Sun Microsystems, who declared in 1984 that “the network is the computer”.
Hardware provides the physical platform upon which software (the instructions that tell computers what to do) performs its magic. Software is written using computer languages that contain instructions for the computer’s hardware in the form of a program. Until the 1950’s computer programs were written in ‘Machine Language’ – complex low-level hardware instructions that a computer would execute directly. In 1954 IBM developed FORTRAN, one of the first ‘high-level’ programming languages used for scientific computing. This was followed by the COBOL programming language in the early 1960s. Both of these languages used natural language elements that made computer programs easier to write, maintain and document.
In 1970, Niklaus Wirth (1934-2024) at the Swiss Federal Institute of Technology released the Pascal programming language. Pascal is a high-level, structured programming language that had a profound impact on computing, as it was used for much of the programming involved in the development of the Lisa and early Macintosh computers. Pascal also became the default programming language for teaching university computer science in the 1980s.
In 1976 Kenneth Bowles, a professor at the University of California San Diego (UCSD) developed a version of Pascal (UCSD Pascal) that could run on personal computers. In 1979 Apple released a version of UCSD Pascal for the Apple II computer, called Apple Pascal. The creation of Apple Pascal was heavily influenced by two Apple employees: Jef Raskin, who had taught computer science at UCSD and Bill Atkinson, who was a UCSD computer science graduate. In 1979 Raskin started the Macintosh project at Apple (later taken over by Steve Jobs). Atkinson was a key member of the Macintosh development team and the author of QuickDraw, the core computer graphics code used to create the Lisa and Macintosh GUI.
Apple later developed Lisa Pascal, which was used to write much of the software powering the Lisa and Macintosh computers between 1979 and 1984. Apple’s Pascal was arguably one of the most powerful software development tools available for personal computers in the late 1970’s and early 1980s. Without Pascal it is unlikely either the Lisa or Macintosh could have been developed. Without the Macintosh, Apple would likely have slowly declined, as its Apple II-based products were overtaken by more powerful personal computers, such as the IBM PC. Without the Macintosh, there would likely have been no iPhone. Nor would Apple have become the first publicly traded U.S. company to be valued at over $2 trillion in 2023.